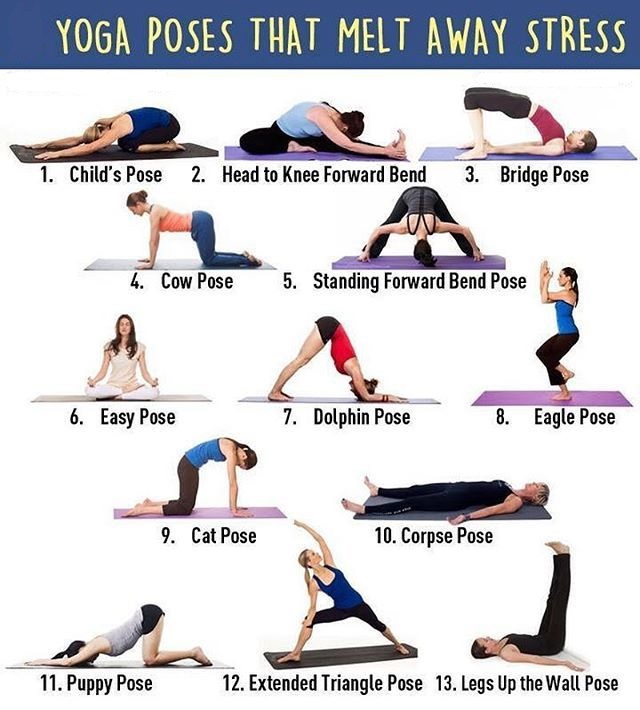
 I wrote an article previous to this in which I expounded the virtues of yoga and guided meditation/visualizations. I believe that yoga is a very worthwhile practice that has helped me to be more grounded and less angry and stressed out when I have given myself over to the practice. A number of the poses are very simple and can be done by anyone, no matter what shape you happen to be in at the start. Of course not all poses should be done by everyone and you should always consult your physician before beginning any new exercise routine.
TABLE:
I would like to start with what I consider to be the most basic and most essential of all poses: Table. First you should start all poses either on a carpet or purchase a yoga mat. You can get a yoga mat at many sporting goods outlets and they are now often for sale at Barnes and Noble Booksellers as part of a package with Yoga videos from GAIA. Don't hesitate to purchase a video or take a class. This is free advice but I'm not a doctor or a Yoga instructor. These are just some poses that work for me and I know how to describe them in print. It's free advice. Take it or leave it. Check a Yellow Pages for classes in your area if you want more detailed instruction. Check a local YMCA or YWCA or Curves for Women or whatever you like. In the meantime-Table.
Start out on a carpet or preferably a yoga mat. Now get on your hands and knees with the top of your feet and your calves pressing against the mat. Press your legs from the knees to the tips of the toes flat into the mat. Now place your hands to distribute your weight evenly between your shoulder blades. Your hands should be as wide as your shoulders-NO WIDER THAN THAT! Your butt should be up. Do not sit on your haunches. Make your body a table from your butt to the crown of your skull. Now make your hand a battering ram and press the top of your skull towards the opposing wall. Gaze straight down at the mat. DO NOT LOOK UP! DO NOT GAZE AT THE OPPOSING WALL! Your eyes should be facing down looking at the placement of your hands. DO NOT SPLAY YOUR HANDS OUT AT AN ANGLE, EITHER OUT OR IN, FROM THE SHOULDERS! Your hands should be directly under the shoulders with the fingertips pointing in the same direction as your head-forward towards the opposing wall.
Now as you gaze straight down at the mat with your head (precisely your scalp) aiming like a battering ram at the opposing wall, fingertips out in the same direction, calves and feet pressed into the mat and back flat as a board from your butt to the crown of your skull, I want you to do one last important thing. Relax your neck and the area between your shoulder blades and find the natural curve of the neck. Relax between the shoulder blades. Let that area drop down slightly as you feel the energy of the body borrowed from the floor. That's right – you heard me right – I said borrow the energy of the floor! Feel how the energy of the floor is dispersed all along the floor in all directions from where you are crouched in table position. Feel the energy rise up from the palms of the hands and spread along the fingertips even as the released energy of the floor spreads all along the calves and the tops of the feet and toes that are pressed into the floor. Feel the relaxed energy travel up the thighs and arms from the outstretched toes, feet, calves and fingertips. Feel all this energy travel at one and the same time out your scalp and along your backbone. Now relax the area between your shoulder blades. This should be the most relaxed area of your body right now. Your neck should be both energized and relaxed. Once you experience everything I've described and it all seems to be happening at once you have successfully entered table position. You are now ready to stretch the arms and legs.
Now still in table position I want you to take your left leg and stretch it out aligned straight with your head, neck and back. Press the left foot back like you are trying to step on thin air. DO NOT KICK THE FOOT BACK LEVEL WITH THE BACK! Press the foot out towards the opposing wall so that if your foot were to reach the opposing wall, you would be standing or walking on the opposing wall. Press the left foot back with the toes pointing toward the floor. Your head, neck and back and left leg should all be perpendicular to the floor. Push back and count to 30 as you borrow the energy of the floor and continue to relax the shoulder blades into the natural curve of the neck. Now reverse the position and push out the right foot in exactly the same manner. Hold for 30 seconds. Release. Now balanced on the right hand, fingertips still in table position, lift up the left arm and push it straight out level with the back and neck. Stretch the fingertips and hold for 30 seconds. Release. Reverse the position. Lift up the left arm. Hold for 30 seconds. Stretch the fingertips straight out. Now lift up both the left arm and the right leg level with the neck, back, and head. Stretch the fingertips of the left hand forward as you push back on your right foot level with the back, the toes facing the floor as you push the whole right foot as if you are stepping on the wall behind you. Hold and count to 30 or 60. Release. Reverse the position. Right arm and left leg extended. Push into the right foot as you stretch the fingertips of the left hand. Release. Now, in table position put your toes under and get ready to go into downward dog.
DOWNWARD DOG
From table curl your toes under to grip the mat. Now push into your toes as you lift the butt and push it back. Keep the knees bent slightly as you lift. Do not make the legs straight on the diagonal. Use the knees as a hinge for lifting. Now pushing up from your fingers and palms, still from table position, make your body sort of a relaxed reversed V as you go backward onto your toes, your knees slightly bent. Slide back on the toes and push the heels back but keep the knees bent slightly. Relax the neck but keep a straight line from the crown of the skull to the lower back and pelvis. Relax. Breathe. You are now in downward dog. From downward dog you can then shift to inclined plane.
INCLINED PLANE
Still on your toes with them bent under, straighten out the knees and let your weight shift much more to your shoulders. Throw your weight forward (Well, shift it to be precise) so that you are basically a diagonal 2×4 or 2×8 or some kind of straight diagonal line from toes to head. Your body is a sort of straight diagonal line from bent toes to the crown of the head with most of your weight now on the palms of your hands. Lift up through the shoulders. Borrow the energy of the floor. Push from the toes all the way out through the crown of the scalp. Keep a diagonal line. Now slowly let all your weight drop. As you bend the elbows back and slowly, slowly sink towards the floor. Do not drop your pelvis or arch your butt up. Keep the line straight as you sink to the floor. You are now ready for Cobra pose.
COBRA
As you bend your elbows in inclined plane and sink into the mat, let your elbows stay bent, your hands flexed at your sides parallel to your shoulders. Your entire body should now be laying flat against the mat except the chin and nose and forehead which should be held up about one inch from the mat. The toes should either still be curled under from inclined plane or you will need to curl them under again. Now lift the upper body from the elbows, fingers and palms as the legs and belly lie flat against the mat. Just lift your chest, neck, and head like a cobra getting ready to strike as you curl your toes under and distribute your weight ever so subtly from your fingertips and elbows to your legs, toes and lower back. Gaze at the opposing wall and hold. Release. Drop the body back to lie prone once more against the floor. You are now ready for Prone Mountain.
PRONE MOUNTAIN
Now with your body face down against the mat breathe and relax your arms at your sides. Your arms should be parallel with your torso but this time turn the fingertips under and do not push your hands or fingers against the floor. Release your toes as well and do not have them bent under for this pose. Now place your arms along your sides with the fingertips trailing down towards the legs and feet. Your hands are no longer where you can see them as the fingers and backs of the hands rest against the floor just as your belly, chest, and legs are resting. Point the fingertips in the same direction as the toes as you lift the arms, fingers, calves, chin and nose about one inch from the floor. Push out at the tips of the toes and fingertips. Push out the crown of the head. Hold the chin, nose, arms, fingers, toes and calves all about one or two inches off the floor. Push and stretch. Release. Congratulations. You have now done some basic beginner yoga poses and are ready for a guided meditation.
.